

How To Create An Iron On With Cricut
If you've ever wanted to make t-shirts with a Cricut, you're in luck! In this tutorial, I'll show you just how easy it is to make gorgeous custom shirts with Cricut and iron-on vinyl. I'll share all of my best tips and tricks so that you can create beautiful iron-on shirts with your Cricut cutting machine, even if you've never done it before.
Keep reading for a helpful step-by-step tutorial on how to make a Cricut shirt with iron-on vinyl and a little creativity!
Making Vinyl Shirts with Cricut
One of the most popular reasons people buy a Cricut is to make custom T-shirts! And I get it – Cricut shirts are one of the first crafts I tried, too!
I've written this tutorial with beginners in mind, so we'll walk through the whole process in depth from start to finish. We'll cover each of the steps that go into Cricut shirt making:
- How to design a shirt in Cricut Design Space
- How to cut iron-on vinyl
- How to weed the design
- How to apply iron-on vinyl to a t-shirt
Plus, I'll answer your frequently asked questions about Cricut shirts and give you some troubleshooting tips.
New to Cricut? You may want to read this first: What is a Cricut Machine, and What Can it Do?
Don't forget to scroll to the bottom for printable directions!
What You Need to Make Cricut Shirts
The Cricut really is the perfect tool for cutting iron-on vinyl for T-shirt making. Here are the supplies you'll need for making shirts with Cricut.
Materials
- iron-on vinyl
- cotton t-shirt, pre-washed without fabric softener
Tools
- Cricut machine (I use both the Cricut Maker and the Cricut Joy)
- LightGrip or an older StandardGrip Cutting Mat
- weeding tools
- Cricut EasyPress, household iron, or heat press
- Cricut EasyPress mat or a folded towel, to protect your work surface
Here's an important tip: For best results,pre-wash the shirt before applying the vinyl. This way, if the shirt shrinks, the vinyl won't buckle or crack. Prewashing the shirt also removes any dirt or oils that could interfere with the vinyl adhesive.
Best Cricut Machine For Making Shirts
A Cricut is an electronic cutting machine that cuts designs you send to it from your desktop or phone. It's a lot like a printer – but it cuts instead of prints. You can read more about Cricut machines and what they can do here: What is a Cricut Machine, and What Can it Do?
There are a few different Cricut machines on the market, and the good news is that all current models of Cricut machines can cut iron-On vinyl for T-shirts.
- The Cricut Maker and Explore series can cut designs up to 11.5″ square on a standard mat.
- The Cricut Joy, which is a smaller machine, can cut designs up to 4.5″ wide and 12″ long on a 12″ mat.
No matter which machine you have, you'll want to use the fine point blade for cutting iron-on vinyl.
What is Iron-On Vinyl?
Iron-on vinyl is a special type of craft vinyl with a heat-activated adhesive. Iron-on vinyl sticks to fabric or other surfaces when pressed with a heat source like a household iron or an EasyPress.
If you are new to the world of craft vinyl, you may be wondering: What is the difference between iron-on and heat-transfer vinyl? The answer is easy: nothing! Iron-on and Heat Transfer Vinyl (or HTV for short) are just different names for the same thing.
Types of Iron-On Vinyl
Iron-on vinyl comes in a lot of different colors and styles. You can buy iron-on vinyl in a rainbow of colors, patterns, and finishes – even metallic foil and glitter. It's available to purchase in sheets, rolls, and packs.
Many people start out with the Cricut brand Everyday Iron-On Vinyl. It's very easy to work with. You can find it in most craft stores and online.
Another popular brand is Siser Easyweed Vinyl, which is available in more than 50 colors at Expressions Vinyl.
Best Shirts for Iron-On Vinyl
Some shirts perform better with iron-on projects than others. I recommend using a smooth-textured, high-quality cotton shirt to get the best result. I really like these cotton t-shirts, which are smooth and so soft!
While I prefer cotton, you can use shirts made from other materials, like nylon, Tencel, or bamboo. The most important thing is to make sure they can withstand the high heat of your EasyPress or iron.
How to Make a Shirt with Cricut
Here are the steps to making an iron-on vinyl t-shirt with a Cricut cutting machine.
Step 1: Upload or Create the Shirt Design
The first step is to upload or create the t-shirt design. We'll be using Cricut Design Space, where you can browse existing projects or design your own image.
Note: If you don't already have Cricut Design Space, you can download it for free. You can use the desktop program on Mac or Windows and download the Design Space app for iOS (iPhone or iPad) and Android devices.
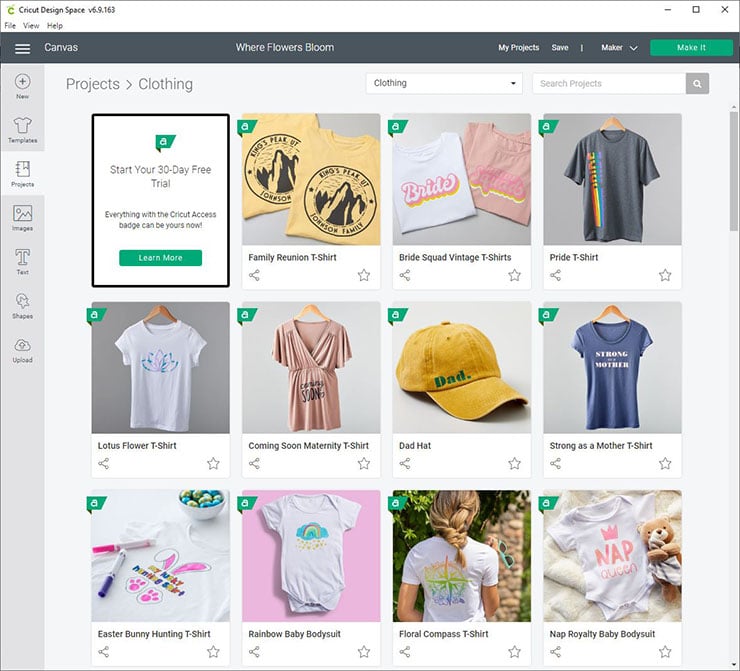
Option 1: Choose a pre-made design in Cricut Design Space.
You can find a variety of pre-made designs for iron-on T-shirts right in Design Space, available with a Cricut Access membership. Click on Projects in the left-hand sidebar, enter the search term "shirt" in the search bar, and browse the results for ideas.
If you're a beginner, try starting with a simple, one-color design. Look for simple shapes and large letters that will be easy to weed.
Option 2: Upload an image or SVG file to Cricut Design Space.
If you've purchased or downloaded a free SVG file that you want to cut, you can upload it to Cricut Design Space. Click the Upload button on the left-hand sidebar, and upload your cut file. Then, you can add the uploaded file to a new project.
If you aren't sure where to find unique SVG files, let me recommend searching on Etsy! Etsy has a lot of designers with a fantastic selection of fun SVG files for t-shirts.
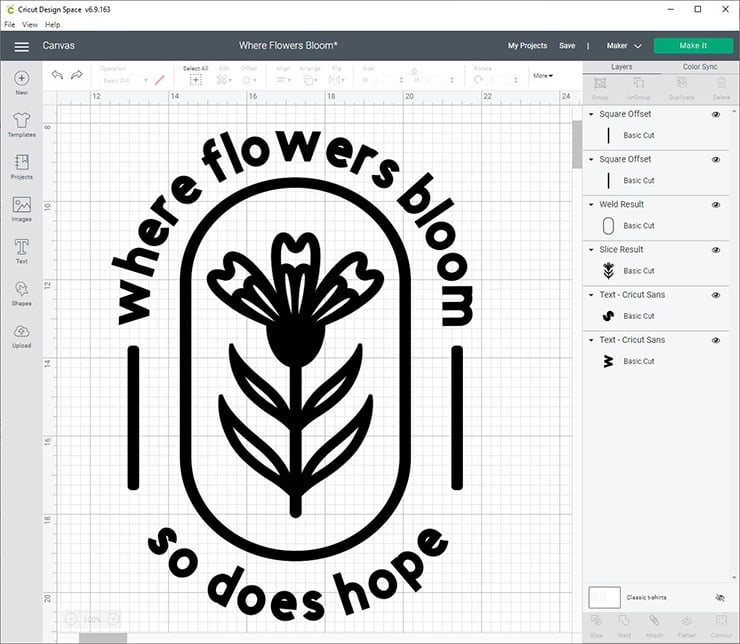
Option 3: Create your own design in Cricut Design Space.
You can also use the tools within Cricut Design Space to create your own designs. This is a great choice, especially if the design you want to make is text-based. For more information about using script fonts in Cricut Design Space, check out this article: How to Connect Cursive Letters in Cricut Design Space.
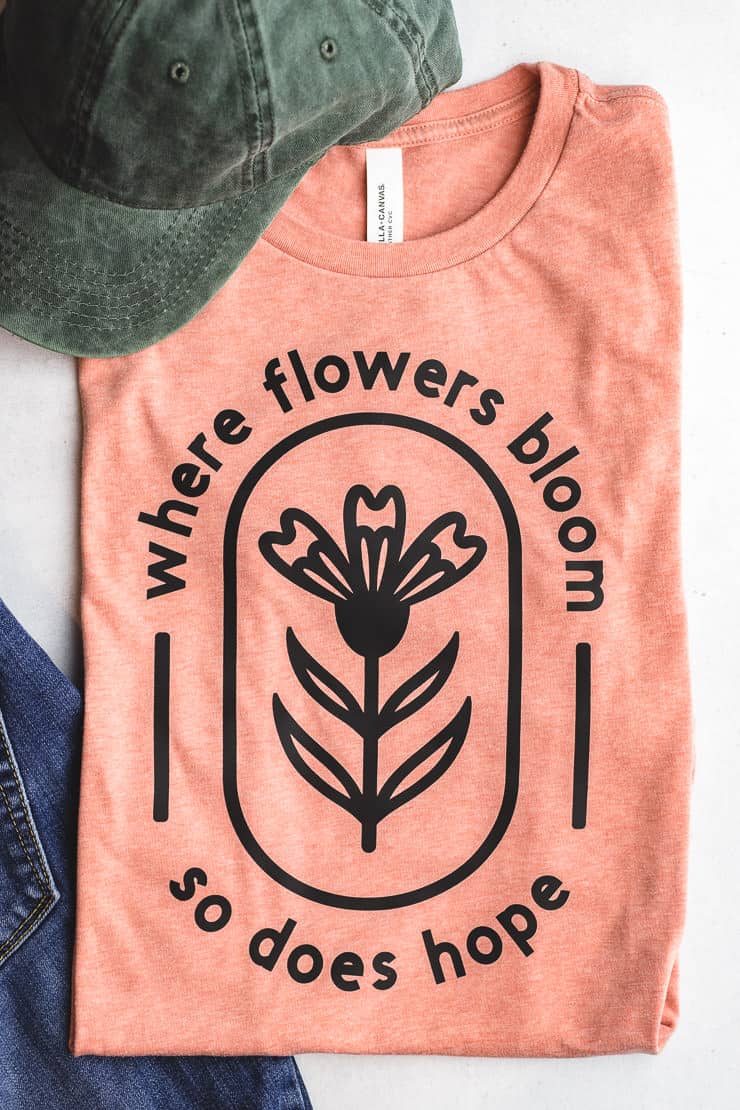
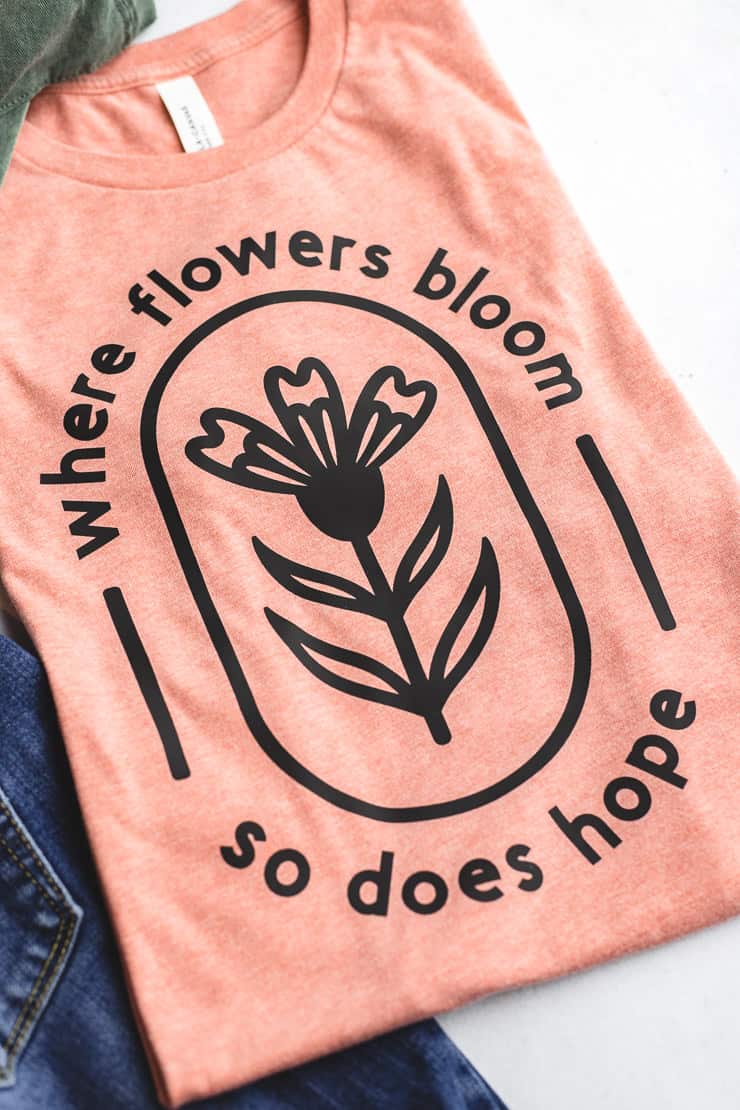
For my shirt, I used the free images, shapes, and text tools within Design Space to create a floral design surround by curved text. Look at the layers panel in the picture above to see the different layers that make up my design.
How big should the t-shirt design be?
You'll want the iron-on design to be at least 10″ smaller than the width of the shirt, measured from armpit to armpit.
For example, if an Adult Medium shirt measures 20″ wide, I'd make the iron-on design about 10″ wide. I'd also place the image about 2″ below the shirt collar.
Note: There isn't a hard and fast rule to tell you how big to make your iron-on designs for Cricut t-shirts – this is just what I tend to do!
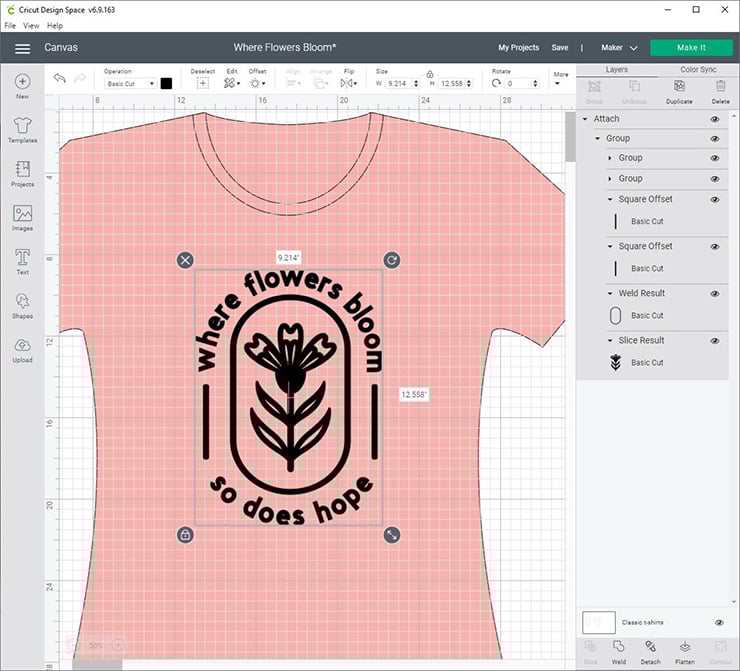
Using a shirt template in Cricut Design Space.
To visualize the iron-on design on a shirt before you cut it, you can use a template in Cricut Design Space.
First, click on Templates in the top left corner. Then, choose "Classic T-Shirt" and use the drop-down menus to select a style, size, and color.
With the template in the background, you can resize your design so it fits on your T-shirt.
Size the design to fit the shirt.
The easiest way to change the size of the design is to use the resize handle. Select the image, and you'll see the resize handle appear in the lower right corner. Click and drag the handle to make the design larger or smaller.
You can also type specific measurements into the Size boxes in the toolbar.
Step 2: Cut Iron-On Vinyl with Cricut
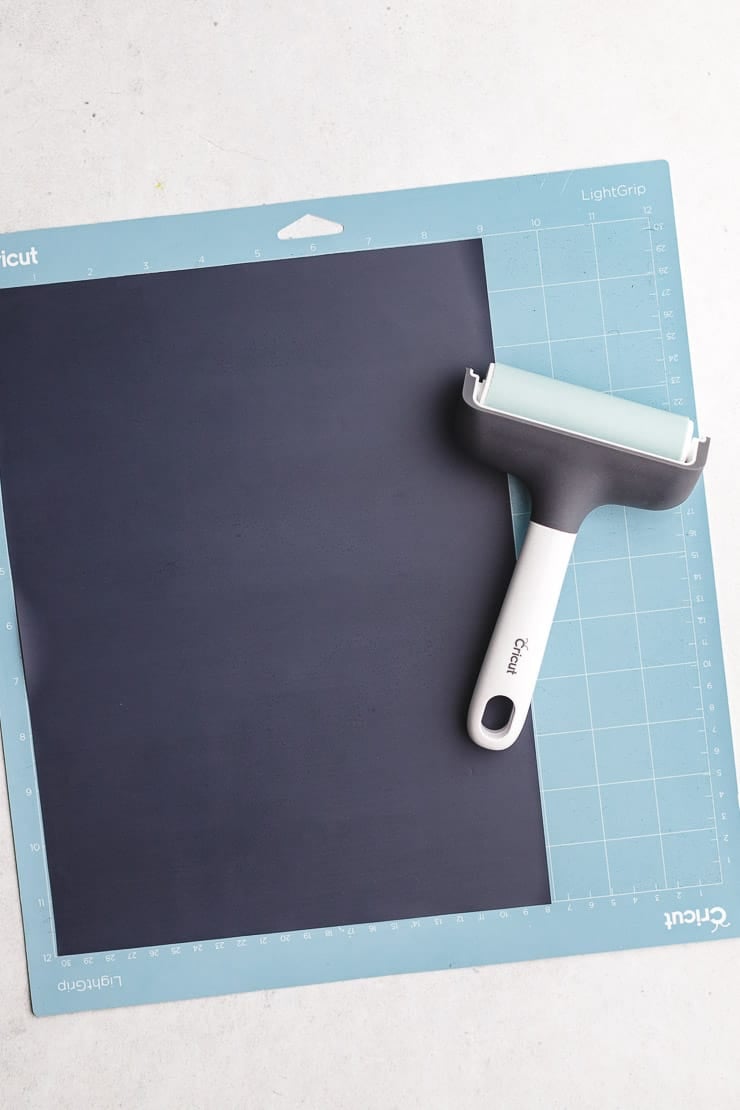
Now it's time to prepare the vinyl and mat for cutting.
First, load the vinyl onto the cutting mat. You'll want to use a LightGrip (blue) cutting mat or an older StandardGrip (green) cutting mat that has lost a little bit of its stickiness. Then, I recommend rolling the vinyl with a brayer tool to make sure it's flat and well-adhered to the mat.
Now, you might have noticed that iron-on vinyl has a dull side and a shiny side. The shiny side is the side with the plastic backing sheet – sometimes called a plastic carrier sheet or plastic liner.
Remember that you mustput the vinyl "shiny side down" onto the cutting mat. This way, the Cricut machine will cut the vinyl, but not the clear plastic layer.
Note: If you are using a patterned vinyl, it ismost likely placed pattern side-down.
When you're ready, press the button to load the mat into the machine. Then, it's time to send the design file to the Cricut machine.

Head back to your computer and Cricut Design Space. Then, send the file to the Cricut machine. Here's how to do that:
- Click the green "Make it" in the top-right corner.
- On the next Prepare screen, click the "Mirror" toggle button to turn it On (which will look green).Remember: All iron-on designs must be mirrored before cutting!Then, click Continue.
- On the next Make screen, select your base material. Choose Everyday Iron-On from the Popular materials list. Or, click Browse All Materials to search for other specialty types of vinyl.Note: If you have a Cricut Explore Air 1 or 2, turn the wheel to Custom so that you can use the drop-down menus.
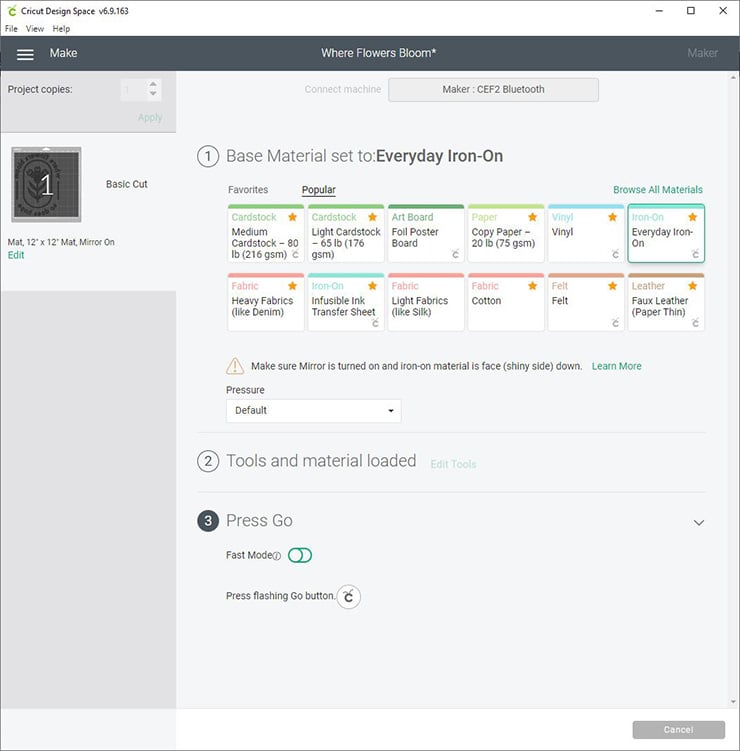
When you select iron-on as your material, Cricut Design Space will remind you to make sure Mirror is turned on, and the iron-on material is facing (shiny side) down.
After that, it's time to cut the design. Load the Fine-Point blade and the mat. Then, click the flashing Go button to cut the design.
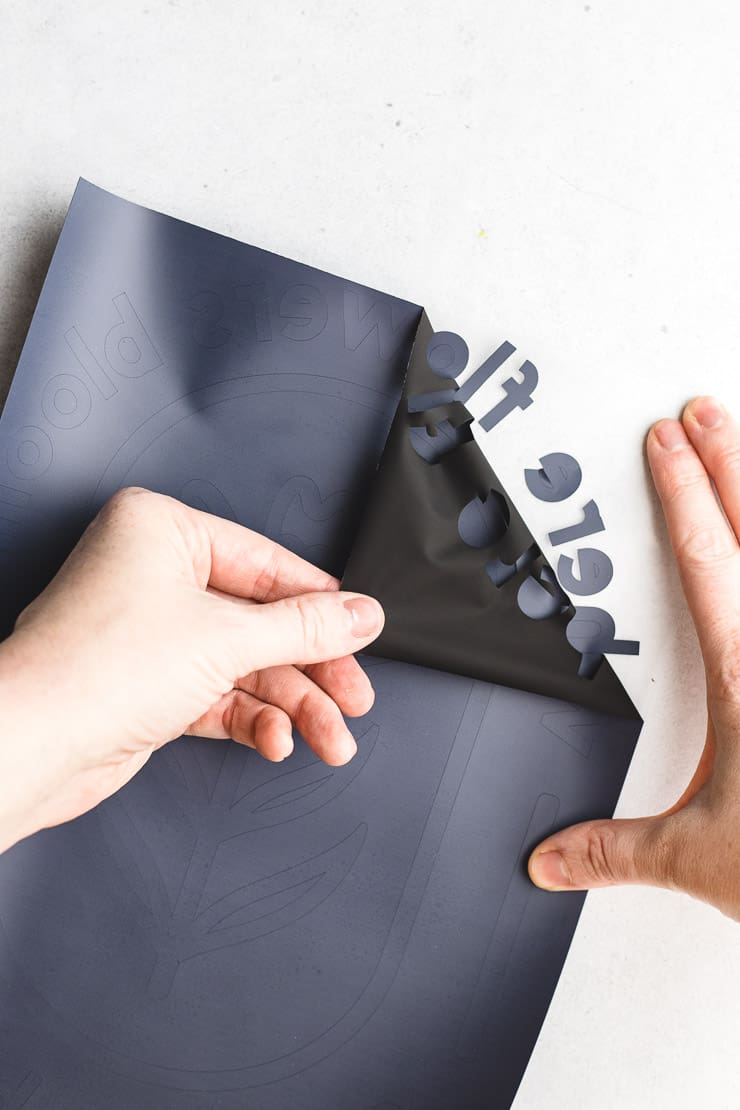
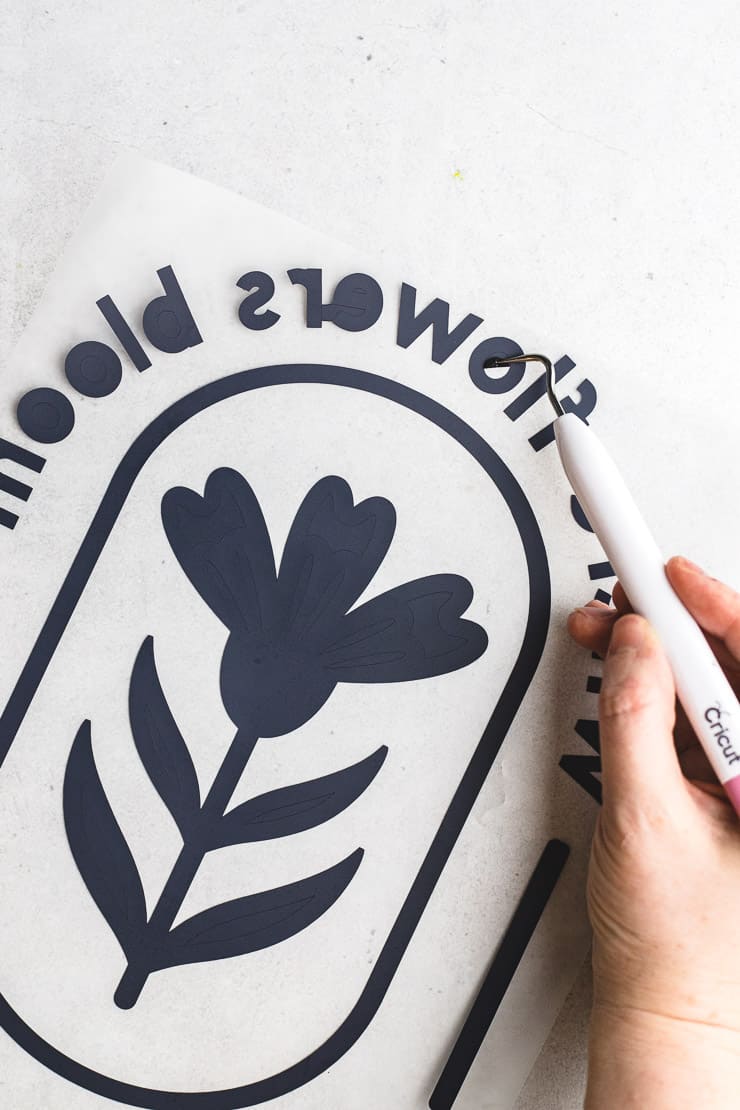
Step 3: Weed the Design
After the vinyl is cut, unload the mat. Then, grab your weeding tools.
The next step is weeding – or removing all the extra bits of vinyl you don't want to transfer to your shirt. For example, you would weed out the circle shape in the middle of the letter "O," as well as the interior spaces of other letters.
I like to start in the corner and use the hook-shaped weeding tool to pull up the extra vinyl. Once you get started, you can use your fingers to pull the extra vinyl off the plastic carrier sheet.
After removing the larger pieces, go back with a small tool or tweezers to weed the small bits. Intricate designs can take a while to weed, but you can always listen to a podcast while you work!
Step 4: Prepare for Pressing
Now it's time to get everything ready for pressing.
First, set up your workspace. Put your EasyPress mat or a clean folded towel on a flat, sturdy, heat-resistant surface. Since you'll be applying a fair bit of pressure, avoid using a flimsy ironing board.
Next, preheat the Cricut EasyPress or your household iron according to the Cricut Heat Guide. The Cricut Heat guide will tell you the exact temperature and pressing time you should use according to the type of vinyl and shirt fabric content you are using.
Note: If you are using a household iron, use the Cotton/Linen setting, which is usually the highest temperature. Make sure to turn the steam setting to OFF.
Then, lay the pre-washed shirt out flat on a clean EasyPress mat. Use the EasyPress to preheat the shirt for 5 seconds. This will also smooth any wrinkles that may be on the shirt.
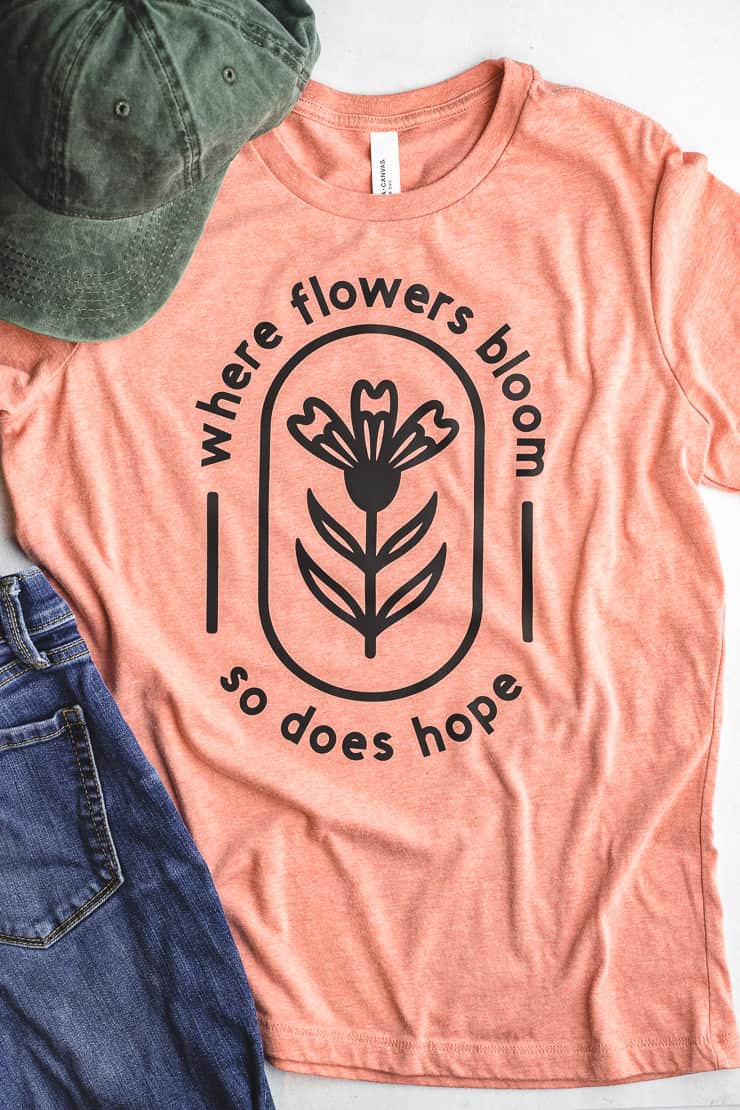
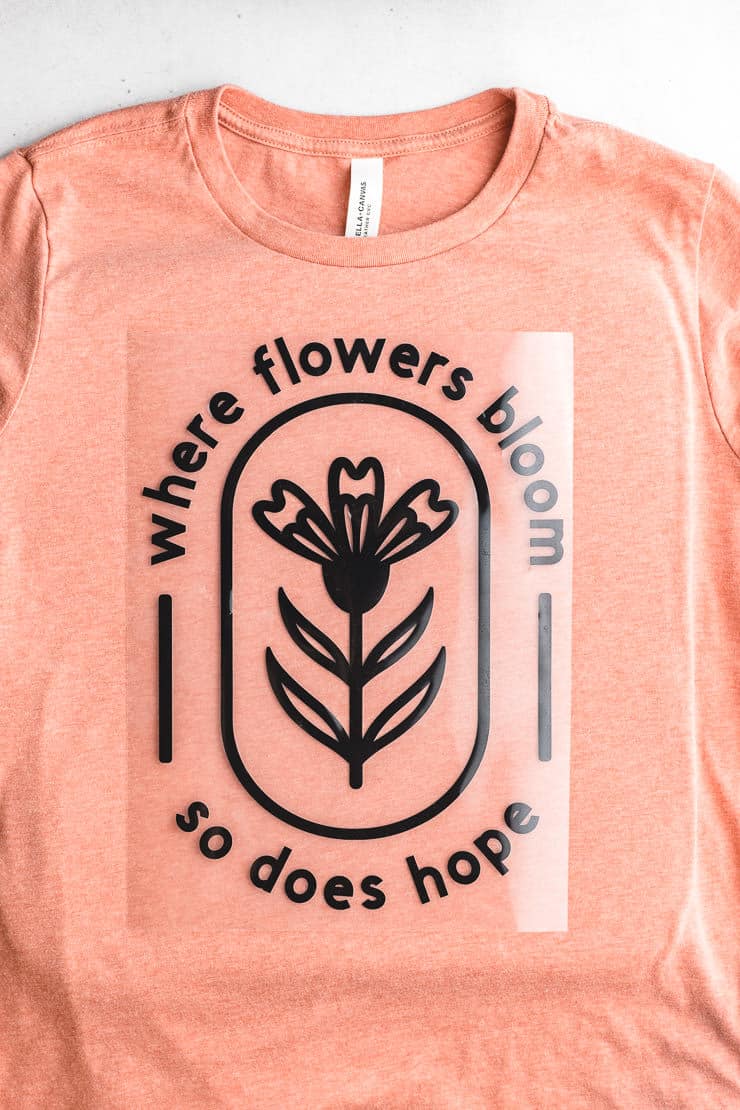
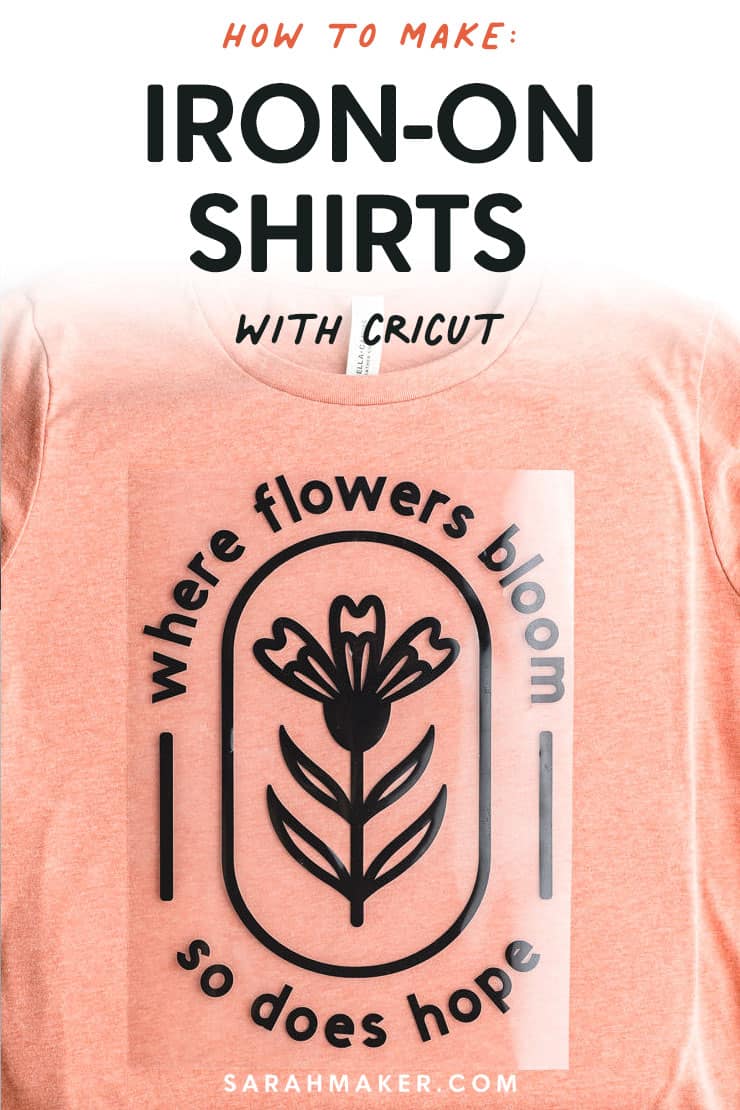
Step 4: Apply Iron-On Vinyl to the Shirt
Center the vinyl design on the shirt. I usually place the design about 2 inches down from the shirt collar, depending on the size of the shirt.
A quick tip: To find the center of your shirt, you can fold it in half and lightly press the folded edge to make a crease. When you unfold the shirt, the crease will mark the centerline. You can find the center of the vinyl design the same way. Fold it in half and press a small crease just on the edge of the plastic carrier sheet. When you line up the creases, you'll know your design is centered.
Place the vinyl design on the shirt with the shiny side up. This means that the plastic carrier sheet is up, and the dull vinyl side is touching the shirt fabric.
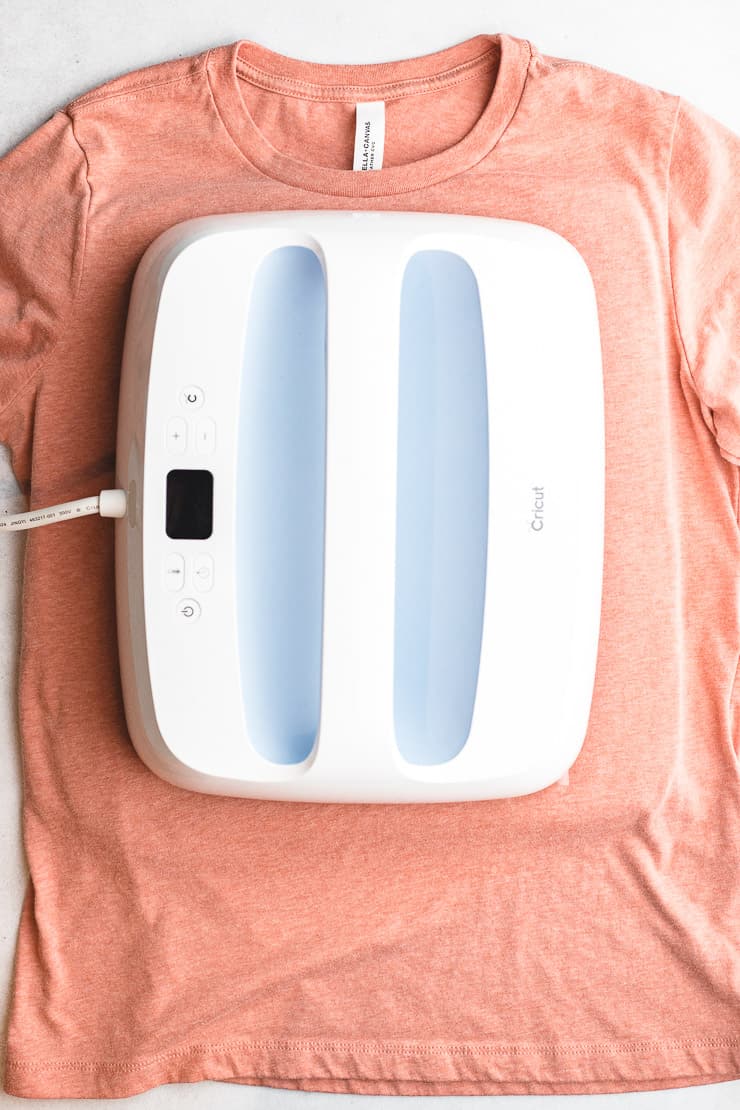
Next, apply heat to the vinyl design as instructed by the Cricut Heat Transfer Guide. For my cotton shirt, I used light pressure at 315°F for 30 seconds.
Then, flip the shirt over and apply heat to the back of the design as instructed by the Cricut Heat Transfer Guide. For my shirt, I used light pressure at 315°F for 15 seconds.
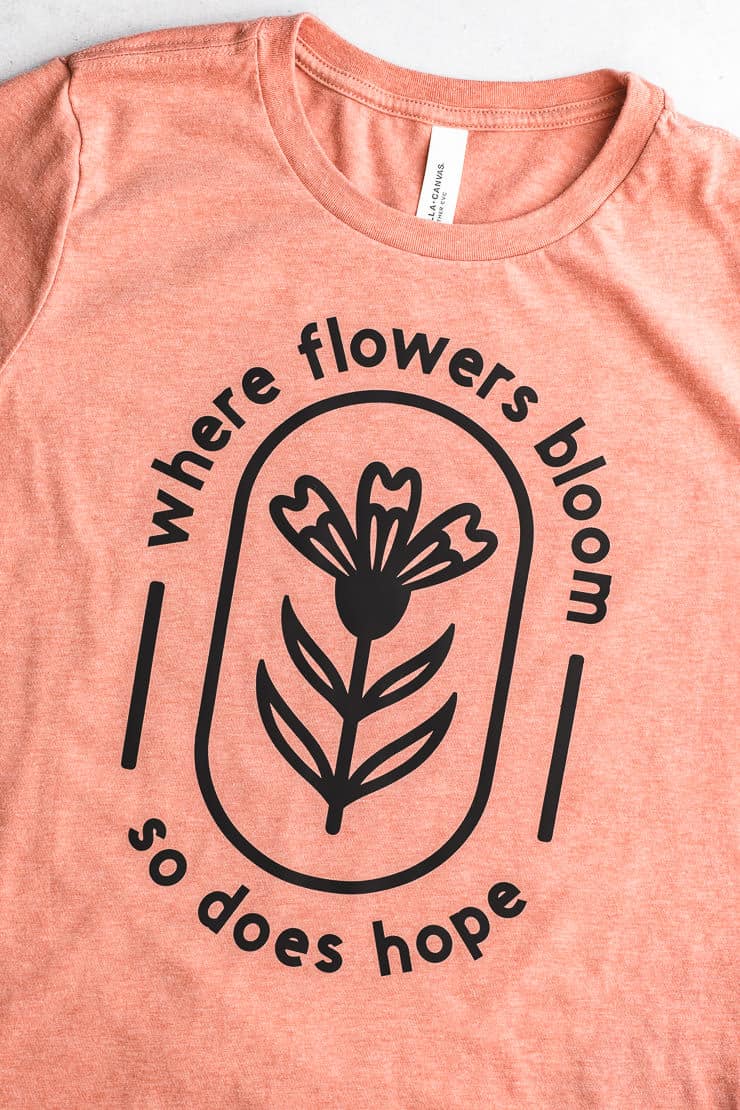
Let the shirt cool to the touch, and carefully peel off the plastic transfer sheet.
Important: Cricut Everyday Iron-on calls for "Cool Peel." This means that you must allow the shirt to cool before removing the plastic liner. If you remove the liner while it's still warm, the iron-on vinyl may not adhere correctly.
Note: Other types of vinyl call for a "Warm Peel," which means you must remove the plastic sheet while it's still warm. Make sure to read the package to know what kind of vinyl you have!
How to Care for Iron-On Shirts
After making your iron-on shirts, launder them carefully to ensure they last as long as possible. The good news is that shirts made with Cricut's Everyday Iron-On vinyl should last up to 50 washes.
Here's some advice for washing iron-on t-shirts:
- First, wait 24 hours after applying the vinyl before washing the shirt.
- Second, turn the shirts inside out before washing. You can wash and tumble dry your shirts, but avoid the highest heat settings.
- Don't use bleach.
Troubleshooting and FAQs
Iron-on vinyl can be tricky to get right at first. If you're having trouble with your shirts, here are some things you can try.
Iron-on vinyl is not sticking to the shirt.
There are a few reasons why the iron-vinyl is not sticking to the shirts. Let's go through the most common reasons for poor adhesion.
- First, make sure that you're using a pre-washed shirt. Pre-washing removes dirt, oil, or sizing leftover from the manufacturing process. These substances can interfere with proper adhesion.
- Next, double-check that your Cricut EasyPress or household iron is set to the recommended temperature for your vinyl and material. You can use the handy Cricut Heat guide to see what they recommend.
- Then, check that the EasyPress or iron made full contact with the shirt. If there are seams, zippers, or folds in the way, the EasyPress may not have made full contact with the vinyl. Also, make sure you're using a firm, flat work surface. (Ironing boards can often be too soft and flexible to give proper support.)
- After that, remember to apply heat to both the front and the back of the shirt. Again, you can check the Cricut Heat Guide for the recommended amount of time.
- If all else fails, you can try to reapply the vinyl. Line up the design, cover with a Teflon sheet, and press the front and back of the shirt with heat for an additional 10-15 seconds.
Vinyl is peeling or bubbling right after applying.
This type of issue can happen if you peel the plastic off the vinyl at the wrong time. Some types of iron-on vinyl are Warm Peel, and some are Cool Peel. Double-check the package instructions, and peel the plastic sheet at the correct time.
Vinyl is lifting off after washing the shirt.
If the edges of the vinyl are lifting after washing, they did not adhere properly. You can re-do the application steps to reapply the vinyl. I recommend using a Teflon cover sheet since you likely don't have the plastic backing sheet anymore.
Explore More Cricut Crafts
If you love using your Cricut machine, I think you'll enjoy these posts:
- How to Make Stickers with Cricut "Print then Cut"
- How to Make Reverse Canvas Wall Art with Cricut
- How to Clean a Cricut Mat and Make it Sticky Again
What's Next?
Pin this post: Save this tutorial to your Pinterest boards so that you can come back to it later.
Leave a comment: I love to hear your feedback. Tell me in the comments below!
Share on Instagram or Facebook: When you make this project, share it on social media and tag me @sarahmaker. I love to see what you make!
Have questions? Join the Facebook Group!
I hope this article was useful for you! If you have any additional questions, feel free to join my Facebook Group. I created this group for you to share pictures, ask questions, and help each other out.
Instructions
- Open Cricut Design Space, and upload or create the t-shirt design.
- Place the iron-on vinyl onto the cutting mat shiny-side down, and roll with a brayer tool. Load the mat intot he Cricut machine.
- From Design Space, send the design file to the Cricut machine to begin the cut. Click Make it, then turn Mirror on. On the next page, select your type of iron-on vinyl, and load the fine-point blade. Press the Go button to start cutting.
- When the cut it complete, unload the mat. Use weeding tools to remove the excess vinyl from the design.
- Set up your workspace for pressing, and preheat your EasyPress according to the Cricut Heat Guide. Preheat the shirt for 5 seconds. Center the design on the shirt, and press the front for 30 seconds. Flip the shirt over and press the back for 15 seconds.
- Let the shirt cool to the touch, and carefully peel off the plastic backing sheet.
Notes
Be sure to check the Cricut Heat Guide before ironing the vinyl. This guide will tell you the specific heat and times, based on your particular type of vinyl and shirt fabric.

Sarah Stearns has helped thousands of makers find their next craft project with free patterns and step-by-step tutorials on her blog, sarahmaker.com. Read more.
Her work has been featured in Scientific American, Good Housekeeping, Vox, Apartment Therapy, and more.
How To Create An Iron On With Cricut
Source: https://sarahmaker.com/make-cricut-shirts/
Posted by: johnsonalitels.blogspot.com
0 Response to "How To Create An Iron On With Cricut"
Post a Comment